

Transform how your customers see pricing in your WooCommerce store with Change Price Title Pro for WooCommerce. This comprehensive plugin gives you complete control over price display text, helping you create urgency, build trust, and boost conversions through strategic price messaging.
Getting Started
After installing and activating the plugin, you’ll find the settings under WooCommerce → Change Price Title Pro.
The plugin is organized into three main sections:
- General Settings – Global price title configuration
- Price Title Rules – Advanced conditional rules with scheduling
- Bulk Configuration – Apply settings to multiple products simultaneously
General Settings
The General Settings tab is your starting point for configuring store-wide price title behavior. These settings apply globally unless overridden by rules or product-level settings.
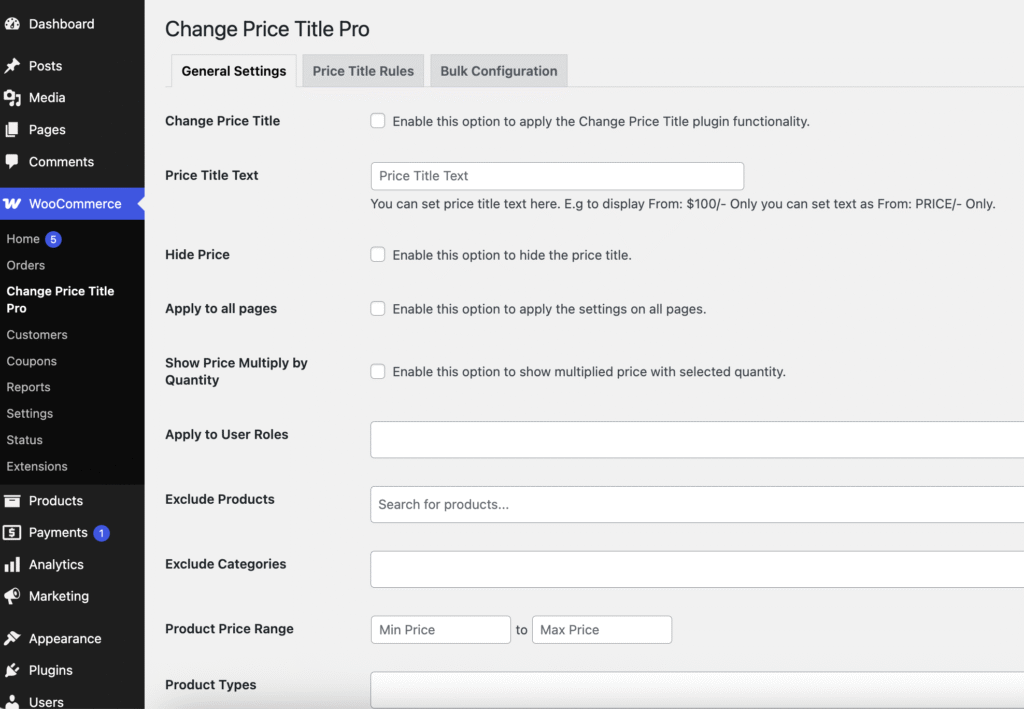
Basic Configuration
1. Enable Price Title
Toggle this checkbox to activate the plugin functionality. When disabled, all price titles revert to WooCommerce defaults.
Use Case: Temporarily disable price titles during regular sales periods without losing your configurations.
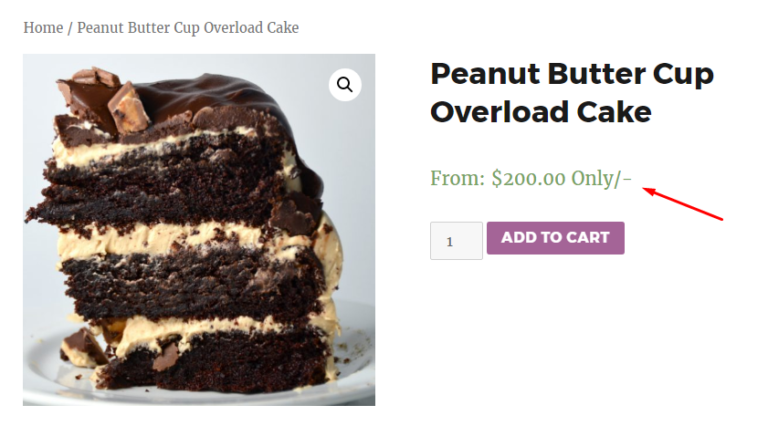
2. Price Title Text
Enter your custom price title text here. You can use the placeholder PRICE which will be replaced with the actual product price.
Examples:
From: PRICE only→ Displays as “From: $99.00 only”Starting at PRICE→ Displays as “Starting at $99.00”Best Price: PRICE→ Displays as “Best Price: $99.00”
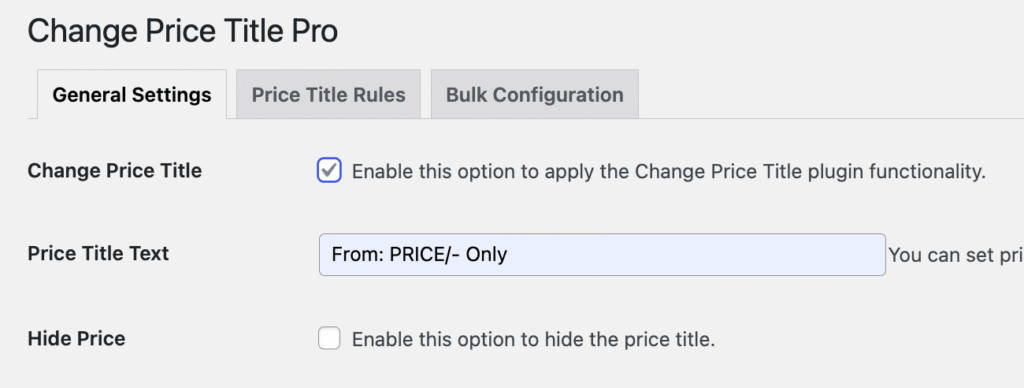
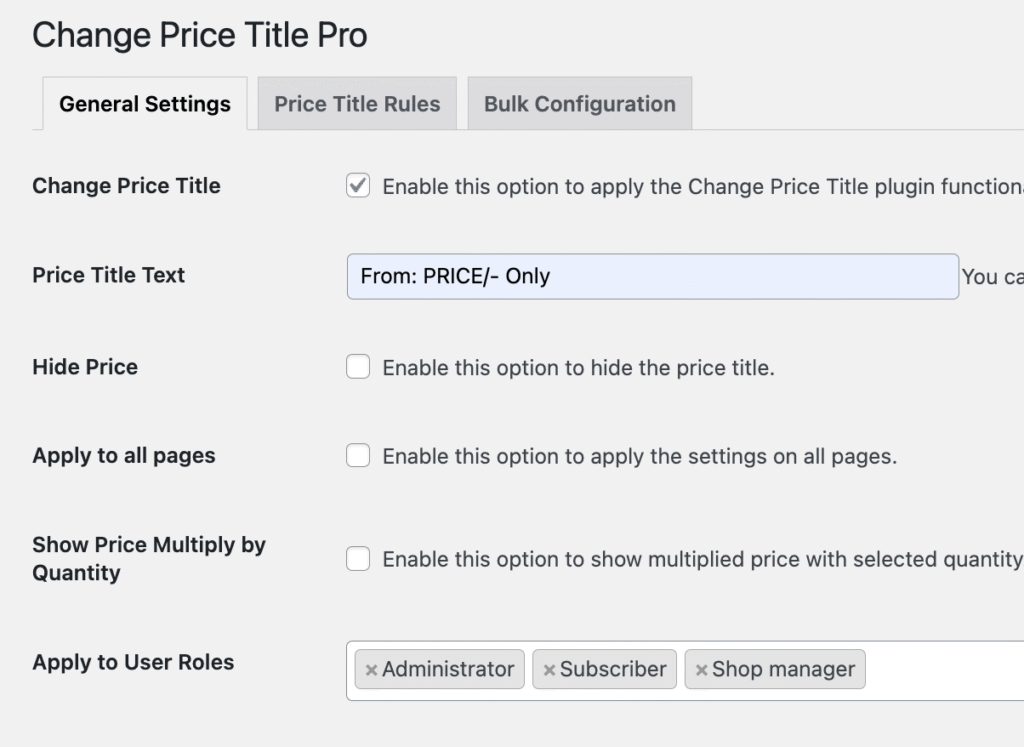
3. Hide Price Title
Enable this option to completely remove the price label while keeping the price amount visible.
Use Case: Clean, minimalist product displays where the price speaks for itself.
4. Apply to All Pages
By default, price titles show only on product pages. Enable this to display them throughout your store:
- Shop page
- Category pages
- Search results
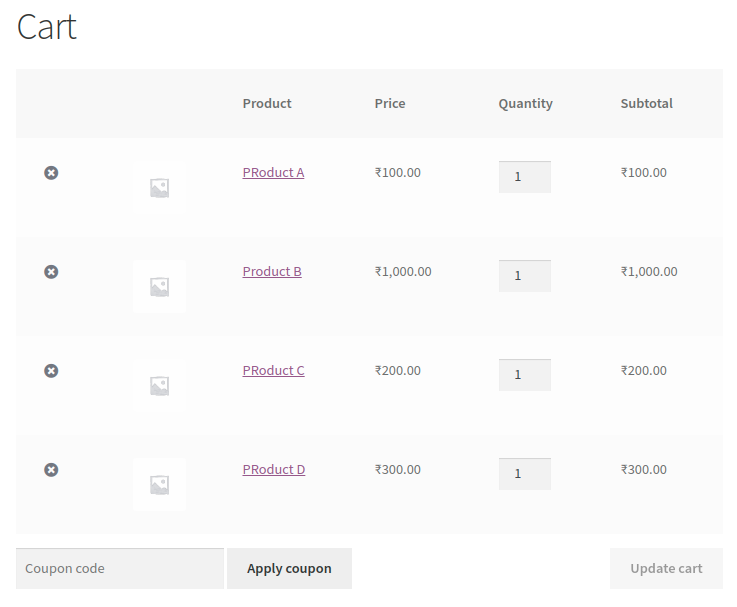
5. Show Price Multiply by Quantity
When enabled, the price title updates dynamically based on the selected quantity. If a customer selects 3 items, the price displays as “3 × $99.00 = $297.00.”
Use Case: Perfect for wholesale stores or products sold in bulk quantities.
Advanced Targeting Options
6. Apply to User Roles
Select which user roles should see your custom price titles. You can target:
- Guests (non-logged-in visitors)
- Customers
- Subscribers
- Wholesale customers
- VIP members
- Any custom roles created by other plugins
Example: Show “Wholesale Price:” only to users with the “Wholesale Customer” role, while retail customers see “Retail Price:”
7. Exclude Products
Search and select specific products that should NOT display custom price titles. These products will show default WooCommerce pricing.
Use Case: Exclude sale items or special promotional products from your standard price title messaging.
8. Exclude Categories
Select entire product categories to exclude from custom price titles.
Use Case: Apply different messaging strategies to different product lines. For example, exclude “Clearance” category from premium pricing labels.
9. Product Price Range
Set minimum and maximum price thresholds. Price titles only apply to products within this range.
Examples:
- Min: $50, Max: $200 → Only products priced between $50-$200 show custom titles
- Min: $100, Max: (blank) → All products $100 and above
- Min: (blank), Max: $50 → Budget-friendly products under $50
10. Product Types
Filter by product type to apply price titles only to:
- Simple Products – Standard single-variant products
- Variable Products – Products with multiple variations (size, color, etc.)
- Grouped Products – Product bundles sold together
- External/Affiliate Products – Products hosted on external sites
Design Customization
11. Prefix/Suffix
Add text before or after your price title for additional emphasis.
Examples:
- Prefix: “🎉” Suffix: “Limited Time” → 🎉 Special Price Limited Time
- Prefix: “💎” Suffix: “VIP Only” → 💎 Member Price VIP Only
12. Icon Selection
Choose from pre-defined emoji icons to add visual interest:
- 💰 Money Bag – Great for savings or deals
- 🏷️ Price Tag – Classic pricing indicator
- ⭐ Star – Premium or featured products
- 🔥 Fire – Hot deals and trending items
- 💎 Diamond – Luxury or exclusive pricing
![]()
13. Custom HTML Content
For advanced users: Replace the entire price display with custom HTML. This gives you complete creative control.
Warning: When using custom HTML, all other options (price title, prefix/suffix, etc.) are ignored.
Example HTML Templates:
Countdown Timer Style:
<div class="price-countdown">
    <span class="timer-icon">⏰</span>
    <span class="timer-text">Sale Ends Soon!</span>
    <span class="price-amount">PRICE</span>
</div>
Social Proof Style:
<div class="social-proof-price">
    <span class="customer-count">👥 127 people viewing</span>
    <span class="price-label">Hot Deal Price:</span>
    <span class="price-value">PRICE</span>
</div>
14. Custom CSS
Add custom CSS styles to enhance your price title appearance. This applies globally across all price displays.
Example CSS:
.price {
    font-size: 24px;
    color: #ff6b35;
    font-weight: bold;
    border: 2px solid #ff6b35;
    padding: 10px 15px;
    border-radius: 8px;
    background: #fff3e0;
}
Price Title Rules
Rules are the powerhouse feature of this plugin. They let you create sophisticated, conditional price titles based on multiple criteria with scheduling capabilities.
Why Use Rules?
Rules override general settings and allow you to:
- Create time-based campaigns (flash sales, seasonal offers)
- Target specific customer segments
- A/B test different price messaging
- Automate pricing communication
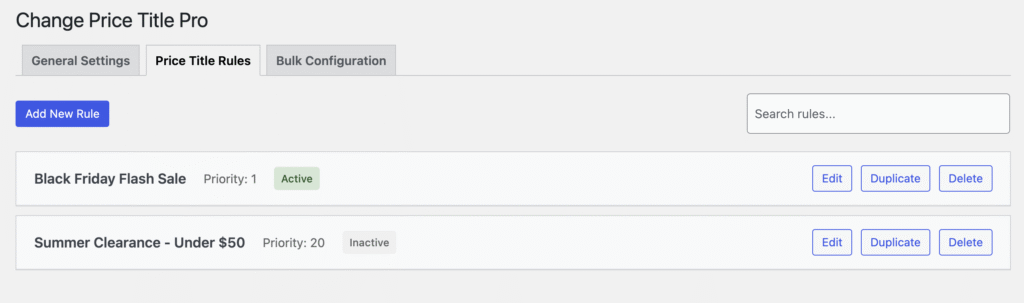
Creating a New Rule
Click “Add New Rule” to open the rule creation modal.
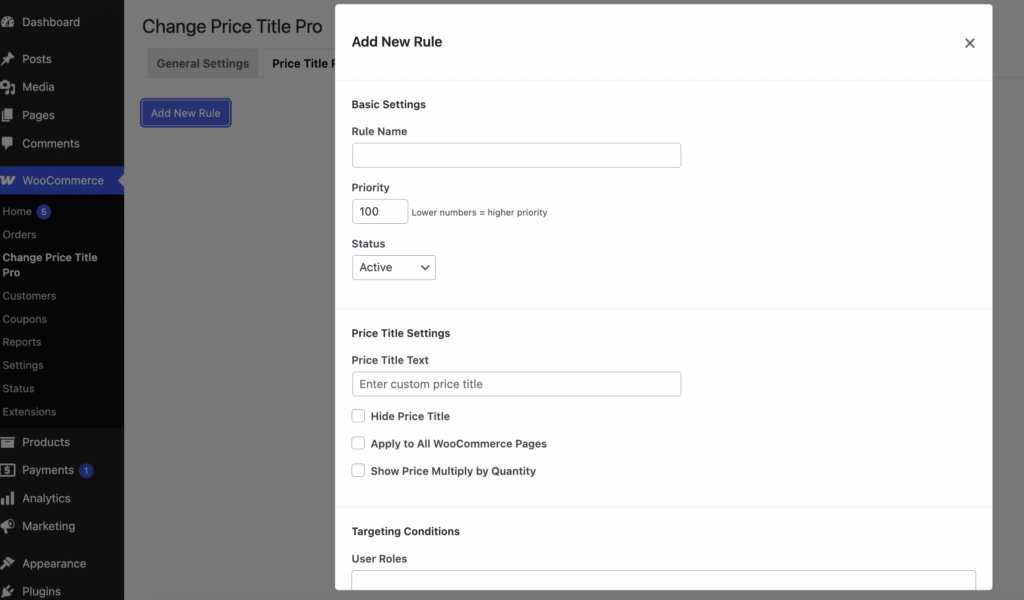
Basic Settings
Rule Name
Give your rule a descriptive name for easy management.
Examples:
- “Black Friday Flash Sale”
- “VIP Member Exclusive Pricing”
- “Summer Clearance – Under $50”
Priority
Rules are executed based on priority (lower number = higher priority). When multiple rules apply to the same product, the highest priority wins.
Example Priority Structure:
- Priority 1: Flash Sale (active during sale hours)
- Priority 10: VIP Members (always active for VIPs)
- Priority 100: Default Rule (fallback for everyone else)
Status
Choose from three statuses:
- Active – Rule is currently in effect
- Inactive – Rule is saved but not applied
- Scheduled – Rule activates/deactivates based on schedule
Schedule Settings
When you select “Scheduled” status, additional timing options appear.
Start Date & Time
When should this rule begin? Set the exact date and time.
Example: December 1, 2024, 12:00 AM – Start your holiday pricing
End Date & Time
When should this rule stop? Leave blank or check “No end date” for permanent rules.
Example: January 2, 2025, 11:59 PM – End holiday pricing automatically
Recurring Patterns
Make rules repeat automatically:
- Daily – Activates every day at the specified time
- Weekly – Activates once per week
- Monthly – Activates on the same date each month
Use Case: “Happy Hour Pricing” that activates every day from 2 PM – 4 PM
Price Title Settings (Within Rules)
Rules include all the same options as General Settings:
- Price title text
- Hide price title
- Apply to all pages
- Show quantity multiply
These work the same way but only apply when this rule is active.
Targeting Conditions
Rules can target specific products and customers with precision.
User Roles
Select which user roles this rule applies to.
Example Rule: “Wholesale Pricing”
- User Roles: Wholesale Customer
- Price Title: “Wholesale Price:”
Include Products
Select specific products this rule should target. Only these products will display this price title.
Example Rule: “Featured Product Promotion”
- Include Products: Summer Dress, Beach Hat, Sunglasses
- Price Title: “Featured Item – Special Price:”
Include Categories
Target entire product categories.
Example Rule: “Electronics Sale”
- Include Categories: Electronics, Computers, Mobile Phones
- Price Title: “Tech Sale Price:”
Product Price Range
Apply rules only to products within a specific price bracket.
Example Rule: “Premium Products”
- Price Min: $200
- Price Max: (blank)
- Price Title: “Premium Quality – Investment Price:”
Product Types
Filter by product type (Simple, Variable, Grouped, External).
Example Rule: “Variable Product Pricing”
- Product Types: Variable
- Price Title: “From: (starting price)”
Advanced Customization (Per Rule)
Each rule can have its own:
- Prefix/Suffix
- Icon
- Custom HTML
- Custom CSS
This allows completely different looks for different rules.
Rule Priority Examples
Scenario: E-commerce store with VIP program and flash sales
Rule 1 – Priority 1:
- Name: “Flash Sale Active NOW”
- Schedule: Today 2 PM – 4 PM
- Price Title: “⚡ 2-Hour Flash Sale Price!”
- Status: Scheduled
Rule 2 – Priority 10:
- Name: “VIP Member Pricing”
- User Roles: VIP Member
- Price Title: “💎 VIP Member Price:”
- Status: Active
Rule 3 – Priority 100:
- Name: “Regular Customer Pricing”
- Price Title: “Best Price:”
- Status: Active
Result: During 2-4 PM, everyone sees “Flash Sale Price” (Priority 1 wins). Outside those hours, VIP members see “VIP Member Price” (Priority 10), while regular customers see “Best Price” (Priority 100).
Bulk Configuration
The Bulk Configuration tab saves you hours when managing large product catalogs. Apply price title settings to hundreds of products with just a few clicks.
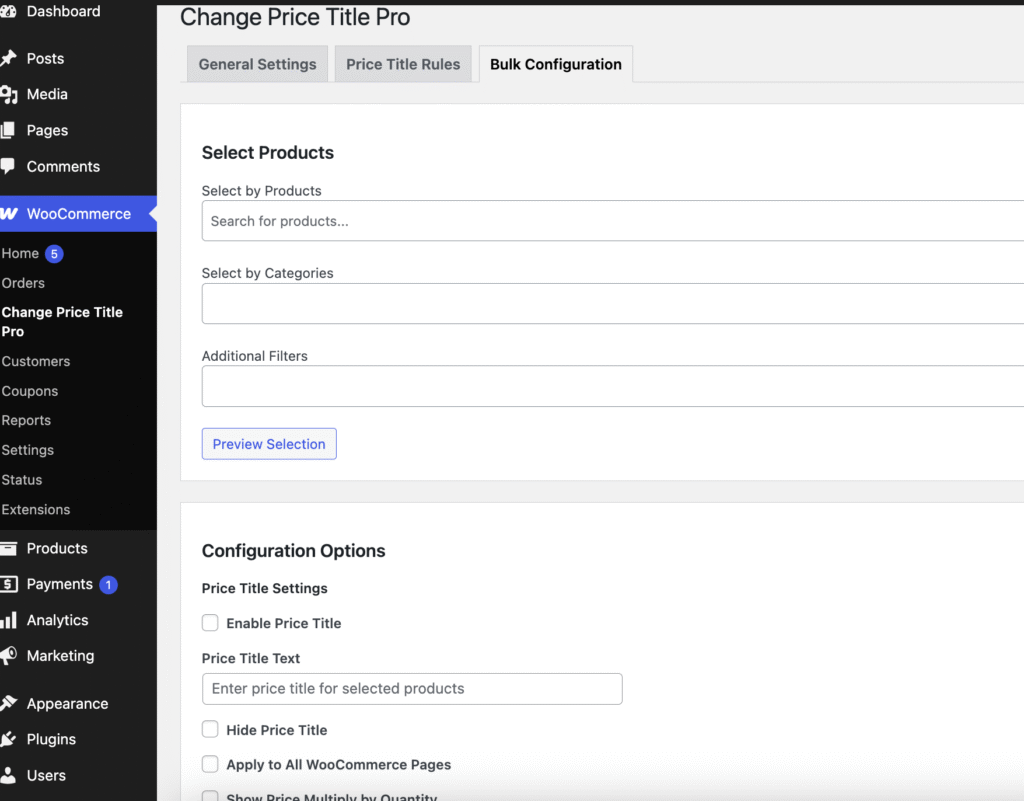
Selecting Products
You have three ways to select products:
1. Select by Products
Search and manually select individual products.
Use Case: Handpicked selection of featured items for a promotion.
2. Select by Categories
Choose entire categories. All products in selected categories will be updated.
Use Case: Apply “Summer Collection” pricing to all products in Beach Wear, Swimwear, and Sandals categories.
3. Additional Filters (Product Types)
Filter by Simple, Variable, Grouped, or External products.
Use Case: Apply specific messaging to all Variable products: “From: $XX.XX (multiple options available)”
Preview Selection
Before applying changes, click “Preview Selection” to see exactly which products will be affected.
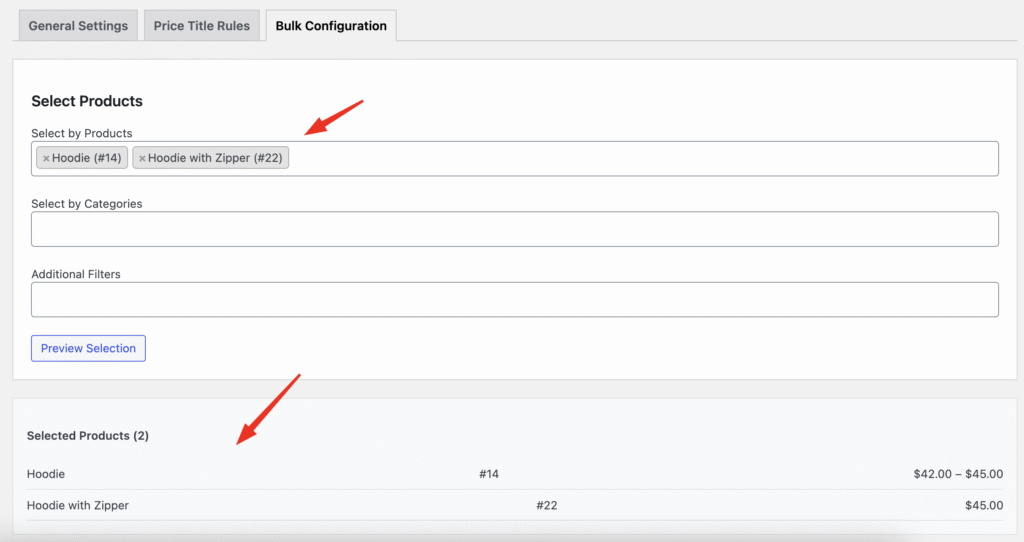
The preview shows:
- Product name
- Product ID
- Current price
- Total count of selected products
This prevents accidental bulk updates to the wrong products.
Configuration Options
Once you’ve selected products, configure the settings you want to apply:
All the same options from General Settings are available:
- Enable/Disable price title
- Price title text
- Hide price title
- Apply to all pages
- Show quantity multiply
- User roles
- Prefix/Suffix
- Icon selection
- Custom HTML
- Custom CSS
Applying Bulk Changes
Click “Apply to Selected Products” to execute the bulk update.
A progress bar tracks the operation:
- Current products processed
- Total products to process
- Success/error messages
Resetting Bulk Selection
Click “Reset Selected Products” to:
- Clear product selection
- Clear category selection
- Reset all form fields
- Start fresh
Real Bulk Configuration Example
Scenario: Holiday Sale on 200+ products
Step 1: Select Products
- Categories: Holiday Gifts, Winter Apparel, Home Decor
- Result: 247 products selected
Step 2: Preview
- Review: All products are correct
- Confirm: Total count matches expectations
Step 3: Configure
- Price Title: “🎄 Holiday Sale Price:”
- Prefix: “Limited Time”
- Apply to all pages: ✓
Step 4: Apply
- Click “Apply to Selected Products”
- Wait for completion: 247/247 products updated
- Success message confirms completion
Step 5: Verify
- Check a few products on the frontend
- Confirm price titles display correctly
Time Saved: Instead of editing 247 products individually (≈12 hours), bulk operation completed in 30 seconds!
Product-Level Settings
Product-level settings give you granular control over individual products. These settings override both General Settings and Rules.
Accessing Product Settings
- Go to Products → All Products
- Edit any product
- Scroll to the “Price Title Settings” section

Available Options
Product-level settings include:
- Enable Price Title – Toggle for this specific product
- Price Title Text – Custom title for this product
- Hide Price Title – Hide label for this product
- Apply to All Pages – Show on all pages for this product
- Show Quantity Multiply – Enable quantity multiplier
- User Roles – Which roles see this product’s custom title
- Prefix/Suffix – Product-specific prefix/suffix
- Icon – Product-specific icon
- Custom HTML – Complete custom HTML for this product
- Custom CSS – Product-specific styling
When to Use Product-Level Settings
Use Cases:
1. Special Products
- Limited edition items
- Exclusive collaborations
- Flagship products
Example: Premium watch product
- Price Title: “Investment Timepiece – Lifetime Value:”
- Icon: 💎
- Custom CSS: Gold border and elegant font
2. Clearance Items
- Final sale products
- Discontinued items
- Last chance offers
Example: Discontinued model
- Price Title: “🔥 Final Clearance – PRICE (While Supplies Last)”
- Hide Price Title: No
- Apply to All Pages: Yes
3. Testing
- A/B testing different price titles
- Trial new messaging
- Experimental pricing display
Example: Test product
- Price Title A: “Best Price Ever: PRICE”
- Monitor: Conversion rate
- Compare: Against standard pricing
Priority Hierarchy
Understanding how settings override each other:
Lowest Priority → Highest Priority:
- General Settings (applies to all)
- Price Title Rules (applies when conditions met)
- Product-Level Settings (always wins)
Example Scenario:
- General Settings: “Best Price: PRICE”
- Active Rule (VIP Members): “💎 VIP Price: PRICE”
- Product Setting (Product #123): “Exclusive Deal: PRICE”
Result:
- Regular customers see Product #123 as “Exclusive Deal: PRICE” (product setting wins)
- VIP members see Product #123 as “Exclusive Deal: PRICE” (product setting still wins)
- All other products follow rules/general settings
Real-World Use Cases
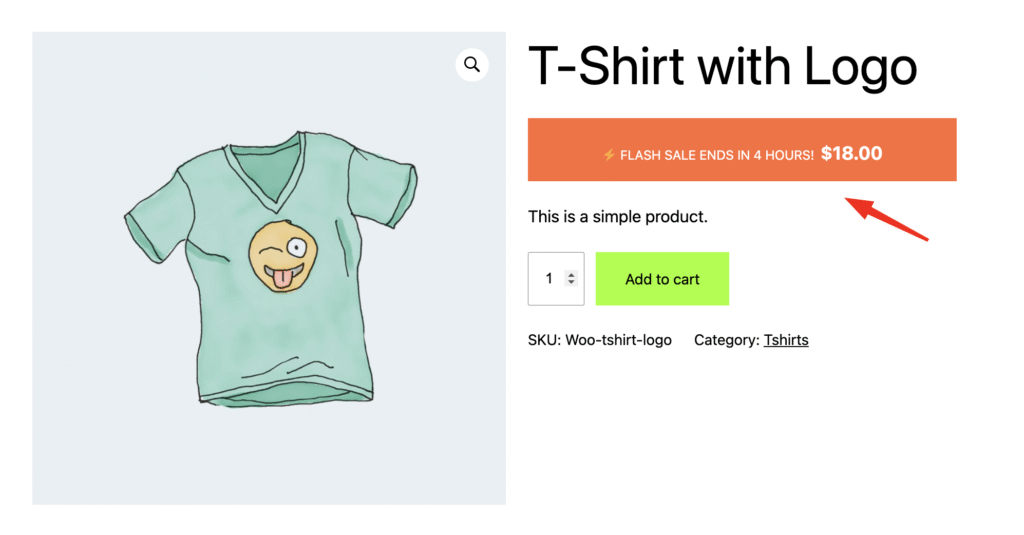
Use Case 1: Flash Sale with Countdown
Objective: Create urgency during a 4-hour flash sale
Setup:
- Create Rule: “Flash Sale – Today Only”
- Schedule: Today 10 AM – 2 PM
- Priority: 1 (highest)
- Custom HTML:
<div style="background: #ff6b35; color: white; padding: 10px; text-align: center;">
    <span style="font-size: 14px;">⚡ FLASH SALE ENDS IN 4 HOURS!</span>
    <span style="font-size: 20px; font-weight: bold; display: block;">PRICE</span>
</div>
Result: Automated flash sale that appears during scheduled hours and automatically disappears after.
Use Case 2: Wholesale vs Retail Pricing
Objective: Show different price labels to wholesale vs retail customers
Setup – Rule 1:
- Name: “Wholesale Customer Pricing”
- User Roles: Wholesale Customer
- Price Title: “📦 Wholesale Price (Bulk Discount Applied):”
- Priority: 10
Setup – Rule 2:
- Name: “Retail Customer Pricing”
- User Roles: Customer, Subscriber
- Price Title: “💰 Retail Price:”
- Priority: 20
Result: Each customer type sees appropriate pricing language that sets expectations about discounts.
Use Case 3: Seasonal Campaign
Objective: Automate holiday pricing for December
Setup:
- Name: “Holiday Pricing 2024”
- Schedule: December 1, 2024 – January 2, 2025
- Include Categories: Gifts, Decor, Party Supplies
- Price Title: “🎄 Holiday Special Price:”
- Custom CSS:
.price {
    background: linear-gradient(135deg, #ff6b6b, #ee5a6f);
    color: white;
    padding: 15px;
    border-radius: 10px;
}
Result: Festive holiday pricing automatically activates December 1st and reverts January 2nd without manual intervention.
Use Case 4: Price Range Segmentation
Objective: Different messaging for budget vs premium products
Setup – Rule 1:
- Name: “Budget-Friendly Products”
- Price Range: $0 – $50
- Price Title: “💵 Great Value Price:”
Setup – Rule 2:
- Name: “Premium Products”
- Price Range: $200 – $999999
- Price Title: “💎 Premium Quality – Investment Price:”
Result: Appropriate messaging that matches customer expectations at different price points.
Use Case 5: Product Launch
Objective: Highlight new product arrivals
Setup:
- Name: “New Arrivals Spotlight”
- Include Products: [All new products]
- Priority: 5
- Schedule: 30 days from launch date
- Price Title: “🌟 New Arrival – Launch Price:”
Result: New products get special attention for their first 30 days, then automatically revert to standard pricing.
Conclusion
Change Price Title Pro for WooCommerce transforms basic price displays into powerful marketing tools. Whether you’re running flash sales, managing wholesale pricing, or creating sophisticated pricing campaigns, this plugin gives you the flexibility and control you need.
Key Takeaways:
- ✅ Use General Settings for store-wide defaults
- ✅ Use Rules for conditional, scheduled campaigns
- ✅ Use Bulk Configuration for efficient management
- ✅ Use Product Settings for special cases
- ✅ Test and measure results
- ✅ Keep it simple and customer-focused
Start with basic price titles, experiment with different approaches, and let data guide your strategy. Your pricing communication is now as flexible as your business needs.
Happy selling! 🚀