

Creating things one by one is definitely hectic… Right? We always look for solutions that can get the job done in the least time, or even in one go. The same thing store owners of WooCommerce are facing is creating multiple categories for their WooCommerce products.
Currently, in WooCommerce, only one category can be created at a time. But by using the Bulk WooCommerce Category Creator plugin, you can easily create multiple categories in one go. At the same time, you can assign those categories to different products. Also, you can create categories in the Parent >> Child hierarchy.
And with the latest version, the plugin has grown into a complete category management suite. You can now edit categories inline in bulk, run a find & replace across all your categories, export your entire category tree to CSV, let AI generate a full category structure from a simple store description, and even let AI auto-categorize all your products. All from a single screen.
In this post, we will see how to install this plugin on your store and how you can use each of these features to save a massive amount of time. If you already know how to install the plugin, then click here.
Let’s first see the current view of the category where you can create the category for your WooCommerce products. Go to the Products -> Categories page. Below is the screen you will see.

WooCommerce Product Categories Page
Here, you can create a category by giving the Name, Slug, Parent Category, Description, Display type, and Image. As you can see on the right side of the screenshot, I have created WooCommerce Plugins and WordPress Plugins categories.
You are safe if your store has fewer categories. But if you have more than 100 categories to manage, then adding them one by one from this page will be a tedious and time-consuming task. And if your store already has hundreds of uncategorized products, manually assigning each one to the right category will take days.
To save you precious time, I have created a plugin called Bulk WooCommerce Category Creator.
Once you purchase the plugin, you can follow the instructions below to install and activate this plugin on your website.
Install Bulk WooCommerce Category Creator
- Log in to the admin of your website.
- Go to Plugins -> Add New.
- Click on Upload Plugin -> Choose file -> Select the plugin file.
- Click Install now and activate the plugin once it is installed.
Once you have successfully installed the plugin, you will see a new sub-menu called “Bulk Category Creator” under the Products menu.
When you open it, you will see a clean tabbed interface with the following tabs:
- Create — Create multiple categories manually and assign them to products
- Edit — Bulk edit existing categories inline (name, slug, description, parent, display type, image)
- Import — Import categories from a CSV file
- AI Category Generator — Describe your store and let AI generate a complete category structure
- AI Auto-Categorize — Automatically assign existing categories to products using AI

List of Features
- Create multiple categories in one go
- Create multiple categories in the Parent-Child hierarchy using the
>>separator - Create multiple categories and assign them to multiple products at the same time
- Import hundreds or thousands of categories from a CSV file
- Bulk Edit existing categories inline — change name, slug, description, parent category, display type, and image from a single table
- Find & Replace across category names, slugs, descriptions, and display types
- Export your entire category structure to a CSV file
- Bulk Delete categories with product reassignment
- AI Category Generator — generate a full category tree from a plain description of your store
- AI Auto-Categorize — automatically assign categories to all your products based on their titles and descriptions
- AI Abilities — external AI agents can create, read, update, list, and delete categories via WordPress Abilities (WordPress 7.0+)
Let’s go through each feature one by one.
Creating Categories Manually
You can add multiple category names separated by a comma in the “Categories” textarea on the Create tab. The categories that are entered in this field will be created under the category selected in the Parent Category dropdown.
You can also give a common description for all these categories by adding some text in the Description field. Also, you can choose the Display type under which the categories will be displayed — Default, Products, Subcategories, or Both.
Let’s get deeper by taking an example. Suppose you are running a store in which you are selling clothes for Men, Women, and Kids. In this store, you sell multiple products, and you want to categorize them by creating multiple categories as shown in the screenshot below.

Categories
As you can see in the above screenshot, some of the categories are appearing in bold letters, and some appear under those bold categories. Let’s create the categories that appear in bold as parent categories.
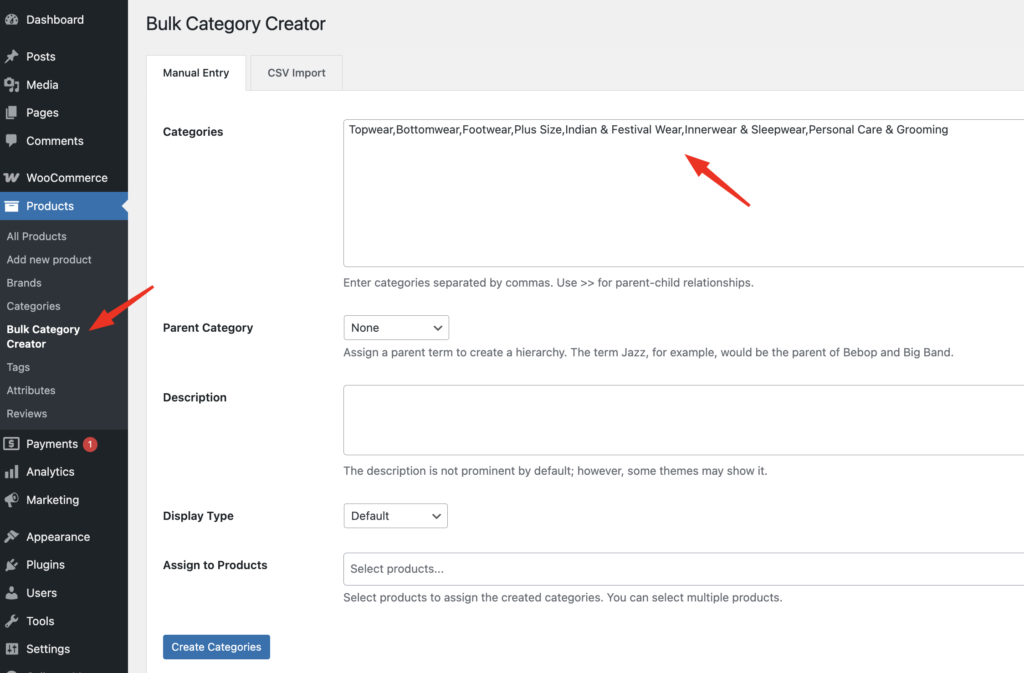
We have entered the names of categories that we want to create, and we have selected ‘None’ in the Parent Category option so that these categories will be considered as the parent category. Also, we have added some text in the Description option.
Now, let’s click on the Create Categories button, and all the entered categories will be created on your website. Once the categories are successfully created, you can check the same by visiting the Products-> Categories page.
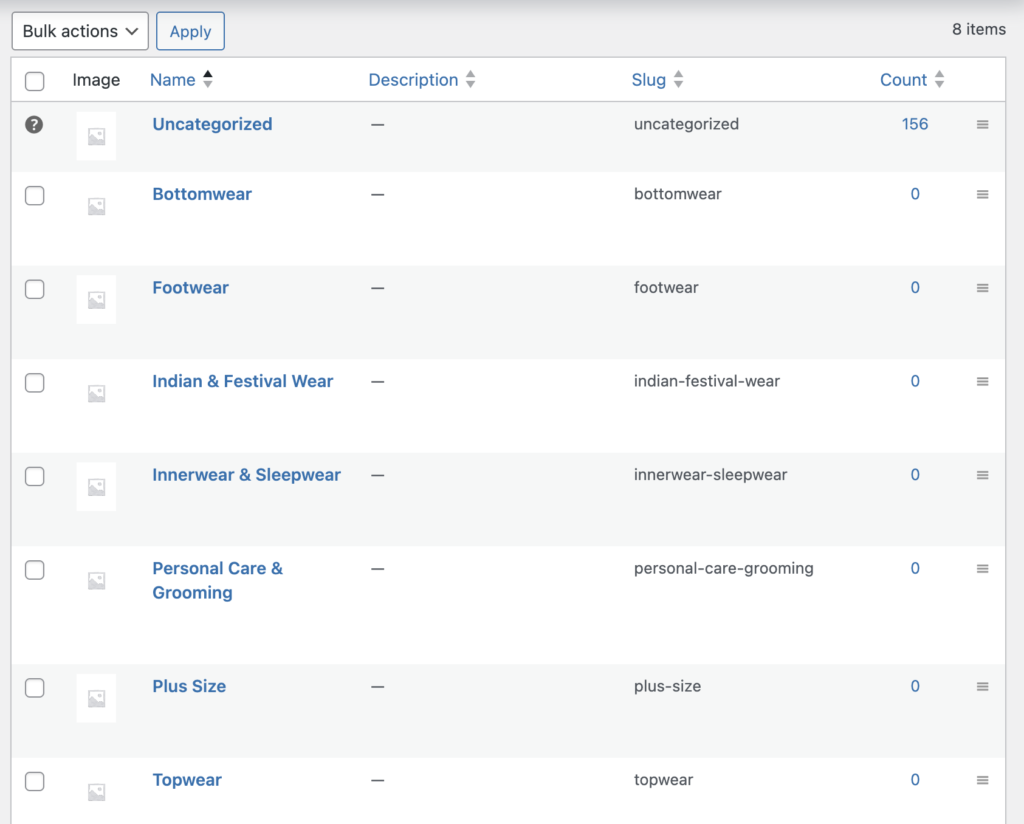
All the categories are successfully created on your site. If you see the Parent category dropdown, then all the categories will be listed there as well. So if someone wants to create subcategories, then they can do the same by selecting a particular category.
As you can see in the screenshot below, I have entered the names of subcategories that we want to create under the Topwear category.
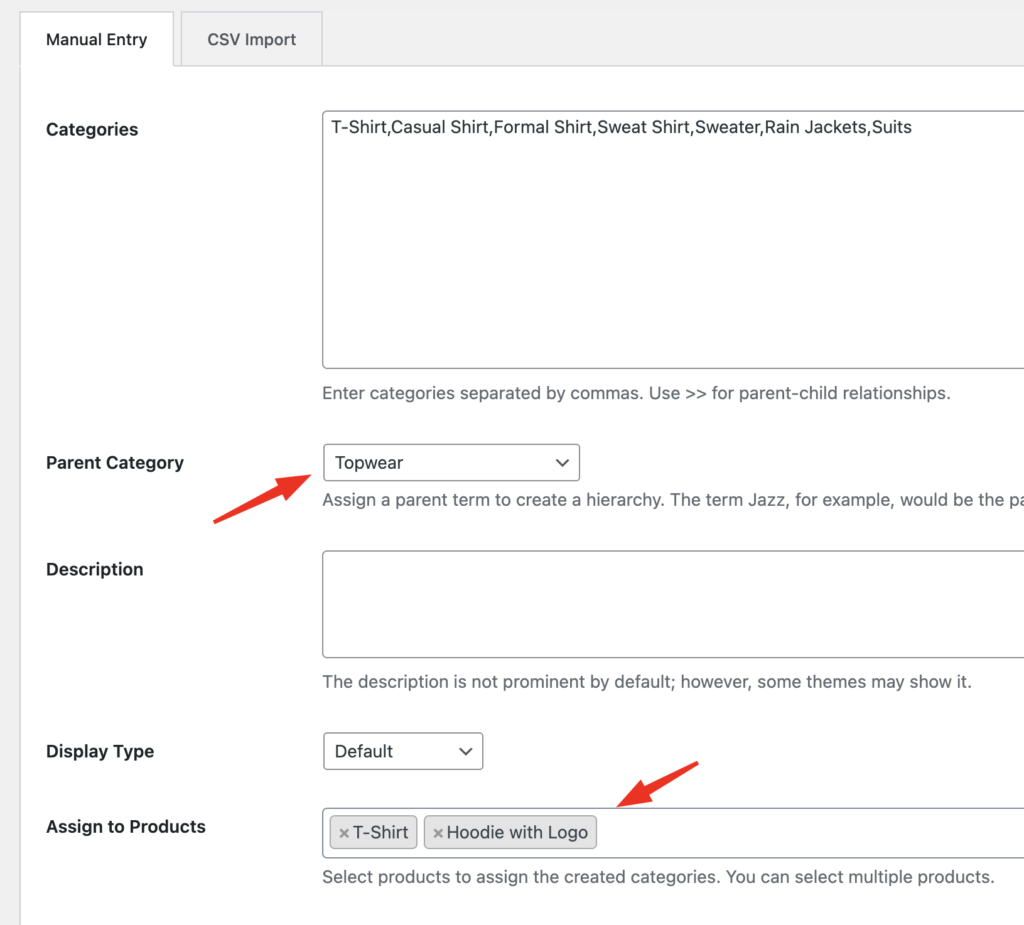
Fill in the Description if you want, select Display type based on the requirements, and click on the Create Categories button. I have selected T-Shirts and Hoodie with Logo products, so the created categories will automatically be assigned to these products. Once you get a success message, visit the Products-> Categories page, and you will see all the entered categories are created under the Topwear category.
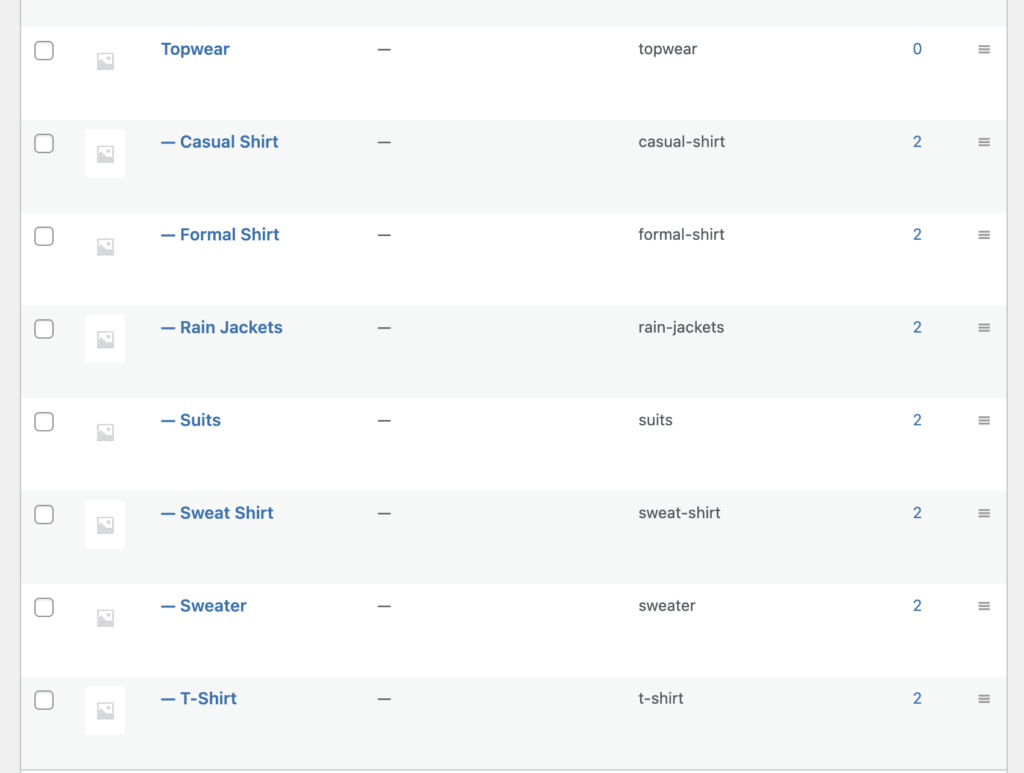
Create multiple categories in Parent-Child hierarchy
It is also possible to create categories in the Parent-Child Hierarchy without touching the Parent Category dropdown. You can use the Parent>>Child format to do the same. e.g., Parent A>>Child A, Parent B>>Child B, Parent C>>Child C.
You can even go three levels deep. For example:
Electronics, Electronics>>Smartphones, Electronics>>Smartphones>>Android, Electronics>>Smartphones>>iOS, Clothing, Clothing>>Men, Clothing>>Men>>ShirtsThat single line creates 7 perfectly structured categories with correct parent-child relationships in one click.


Assign the created categories to products
Creating categories is only half the job. Normally, you’d then have to go through each product and manually assign it to the right categories. The plugin eliminates that second step entirely.
Both the Create and Import tabs include an Assign to Products selector. You can choose All Products or pick specific products using a searchable multi-select dropdown.
The plugin is smart about it too:
- It preserves existing category assignments — new categories are appended, not replaced
- It works smoothly even with large catalogs thanks to the searchable dropdown
- It works with all three creation methods — Manual Entry, CSV Import, and AI Generator
Create multiple categories using CSV Import
If you already have the CSV data for your categories to be added to your WooCommerce store, then there is an option in the plugin to upload the CSV in a particular format so that all those categories will be imported to your WooCommerce Store.
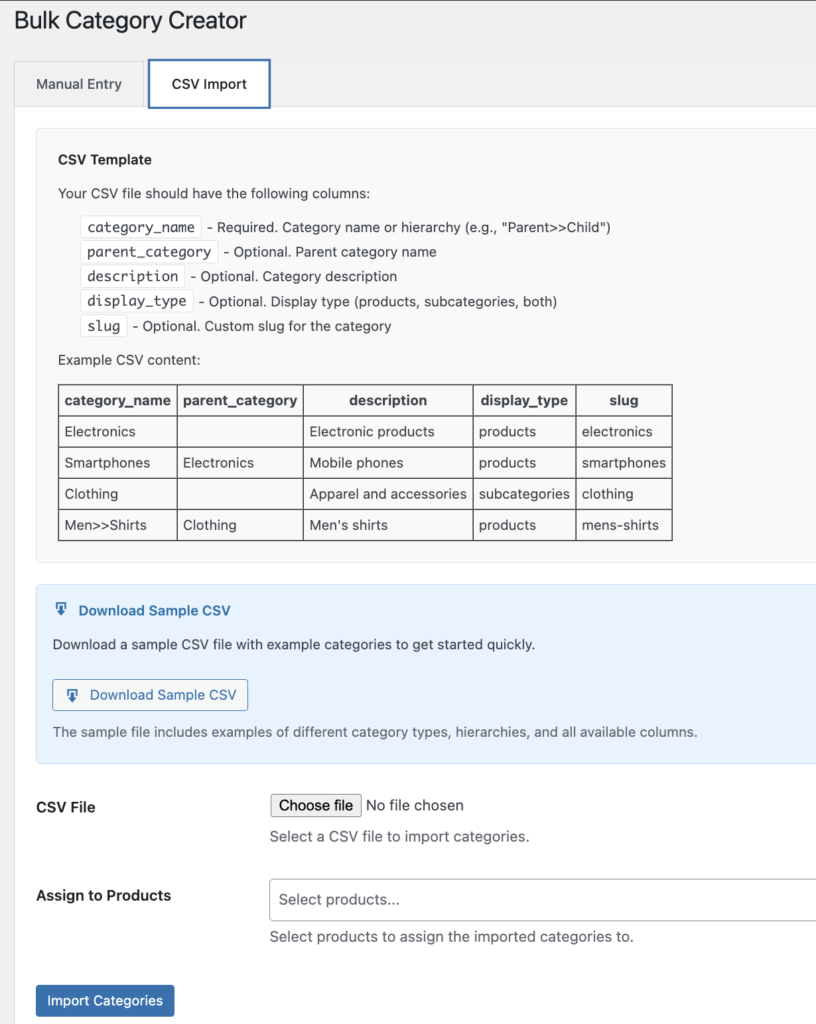
The CSV file supports the following columns. Only category_name is required — everything else is optional:
- category_name — The category name or hierarchy (e.g.,
Parent>>Child) - parent_category — Name of the parent category (an alternative to the
>>separator) - description — Category description text (HTML allowed)
- display_type —
products,subcategories, orboth - slug — Custom URL slug for the category
You can download the Sample CSV from the Import tab and arrange your categories data according to it. Below is the screenshot of the Sample CSV.
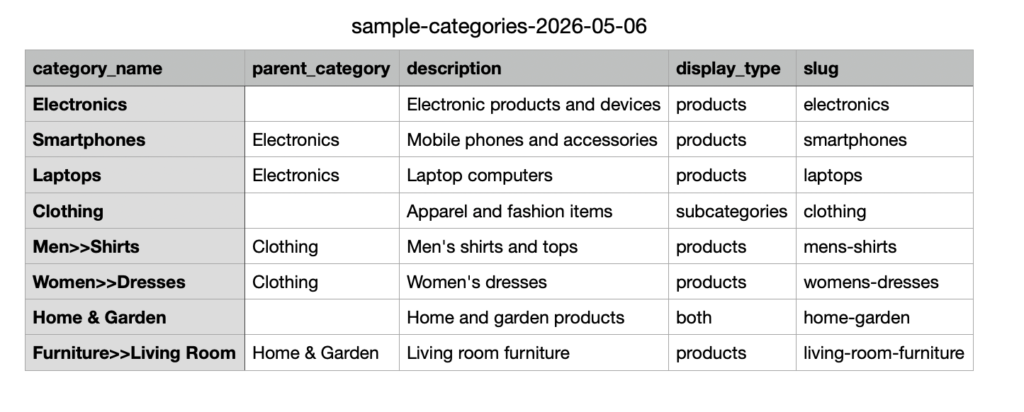
One thing worth knowing — if a category in your CSV already exists (same name, same parent), the plugin reuses it and reports it as skipped. That means you can safely re-run the same CSV without creating duplicates.
Bulk Edit — manage all your categories from one table
Creating categories is just the beginning. As your store grows, you’ll need to reorganize, rename, and refine your category structure. The Edit tab puts complete control of your entire category tree at your fingertips — all from one powerful, inline-editing table.
Click Load Categories and every product category is loaded into a table where you can edit everything inline:
- Name, Slug, and Description
- Display Type (Default, Products, Subcategories, Both)
- Parent Category — reassign any category to a different parent
- Category Image — upload, change, or remove the thumbnail directly from the table via the WordPress media library
You can save changes in two ways:
- Save — saves the individual row you’re working on
- Save All Changes — applies every edited row in a single operation
Want to delete categories? Use the checkboxes on the left to select one or more, then click Delete Selected. A confirmation prompt appears first so nothing is removed by accident.
Find & Replace — fix typos across all categories instantly
Ever noticed that you spelled a word wrong in 30 categories? Or you renamed a product line and now need to update the category names, slugs, and descriptions everywhere? That’s exactly what Find & Replace is for.
Click Find & Replace on the Edit tab to open the search panel. You can search and replace text across:
- Category names
- Slugs
- Descriptions
- Display types
You can also toggle case-sensitive matching and whole word only matching for precise control. And most importantly — nothing is changed until you confirm. Click Preview changes first to see every match highlighted, then uncheck any row you don’t want to change, and finally click Apply changes.
Export your categories to CSV
Sometimes you just need a backup, or a spreadsheet to analyze your categories offline, or a file to migrate your structure to another store. Click Export Categories to CSV on the Edit tab and you’ll get a complete download including:
- Category ID
- Name
- Slug
- Description
- Parent ID and Parent Name
- Display Type
- Image ID
- Product Count
This is also a great safety net — before making large structural changes in the Bulk Edit table, export your categories first so you have a reference to restore from if needed.
AI Category Generator — describe your store, get your categories
This is the feature no other WooCommerce category tool has. Instead of planning your category structure yourself, just describe your store in plain English — and the AI generates a complete, structured, ready-to-import category hierarchy in seconds.
Here’s how it works:
- Open the AI Category Generator tab
- Describe your store in the textbox (up to 1000 characters). For example: “I sell handmade leather bags, wallets, belts and accessories for men and women. I also have a seasonal gift range.”
- Choose how many categories you want (~6, ~10, ~20, or ~40)
- Choose how deep the hierarchy should go — top-level only, up to 2 levels, or up to 3 levels
- Click Generate Categories
Within seconds, you’ll get a complete category tree. And it’s not set in stone — you can:
- Edit any category name inline
- Remove categories you don’t want with the × button
- Reorder with the up/down arrows
- Add your own categories with the input field at the bottom
- Regenerate for a completely different structure
- Copy the final list to your clipboard
When you’re happy with the list, click Insert into Manual Entry — the categories are loaded into the Create tab so you can review them one final time and create them in one click.
Do I need an AI API key?
It depends on your WordPress version:
- On WordPress 7.0 or later — if you already have an AI provider connected under Settings -> Connectors, the plugin uses it automatically. No separate API key needed inside the plugin.
- On older WordPress versions, or if you want to use a specific key — open the API key panel in the AI tab, choose Anthropic Claude or OpenAI GPT, paste your key, and click Save Key.
You can remove a saved key at any time by clicking Remove Key — the plugin will fall back to your WordPress AI Client if one is available.
AI Auto-Categorize — assign categories to every product automatically
What if you never had to manually categorize a product again? AI Auto-Categorize is the game-changer that does exactly that. It analyzes your product titles and descriptions, compares them against your existing category structure, and suggests — or automatically applies — the most relevant categories.
Here’s the workflow:
- Open the AI Auto-Categorize tab
- Choose your Product Scope — Only uncategorized products (recommended) or All products
- Set your Confidence Threshold — only suggestions above this confidence will be shown (0% to 100%)
- Choose Max Categories per Product — from 1 to 10
- Click Preview Suggestions
Before any AI call is made, the plugin tells you exactly how many products will be processed and which provider will be billed. That way you’re never surprised by API costs.
As products are processed, you can review each suggestion in the results table. For every product you can:
- Remove a suggested category with the × button
- Add extra categories using the Add Categories button (which opens a checkbox modal)
- Stop the entire run at any time — no further AI requests are sent after clicking Stop
When you’re happy with the curated list, click Apply Changes. Categories are added to each product, and the WooCommerce default “Uncategorized” placeholder is removed from products that now have real categories.
And one thing you never have to worry about: existing category assignments are preserved. New categories are appended, not replaced.
AI Abilities — let AI agents manage your categories
On WordPress 7.0 or later, the plugin registers five WordPress Abilities under the bwcc category. These allow external AI agents — connected via a WordPress MCP adapter — to manage your categories conversationally.
For example, once connected to Claude or another AI agent that supports MCP, you can literally say: “Create a category called Smartphones under Electronics” and it will happen. The five registered abilities are:
bwcc/create-category— create a new product categorybwcc/get-category— retrieve a category by ID or namebwcc/list-categories— list categories with filtering, search, and paginationbwcc/update-category— update name, slug, description, parent, or display typebwcc/delete-category— delete a category with optional product reassignment
All abilities require the manage_product_terms capability, so only users who can manage categories have access.
A quick note on performance and large stores
If your store has thousands of products, the plugin handles that gracefully:
- Category creation, CSV import, and CSV export scale to any number of categories
- AI Auto-Categorize processes products one at a time by default, so requests never outlive your server timeout. You can safely run it in multiple sessions if needed
- For very large category trees, prefer the “Export CSV -> edit in spreadsheet -> re-import” workflow over inline editing for bulk structural changes
Wrapping up
This way, by using the Bulk WooCommerce Category Creator plugin, you can create as many categories as you want on your site with the least amount of time and effort. Whether you prefer to type, import from a spreadsheet, edit existing categories in bulk, or let AI do the planning and categorization for you — the plugin has a workflow for every style.
If you have any questions about any of the features covered here, or if you’d like to suggest a new feature, feel free to reach out through our contact page.

Awesome post! Keep up the great work! 🙂
Thanks. 🙂
Great content! Super high-quality! Keep it up! 🙂
Thank you 🙂
There is currently an issue whereby if the subcategory name is the same as another subcategory, it says that this already exist
Hi Larry,
I am assuming that you are trying to add categories in the Parent-Child hierarchy and trying to use the same category name in different Parent-Child hierarchy. If you will try to add category with the same name then it will show an error message that the category already exists.
I am having this same issue.
This issue is now resolved.
Is there a workaround for this issue by any chance?
Hi Shama,
This issue is now resolved.
Any plans to solve this issue?
Hey Johnny,
This issue is not resolved. Kindly use the latest version of the plugin.
Feel free to let me know if you face any issues.
Hi Kartik,
Thanks for your awesome plugin… I might have some added requirement for uploading the categories with its child and has different metadata. Would it be possible to do that?
The format would be something like this:
Parent A Category >> Child A category
Parent A Description >> Child A description
Right now, I think I have no issue on uploading the category with child, is just that adding some metadata (description, thumbnail) to each
I look forward to hearing back from you.
Regards,
Paul
Hi Paul,
You are welcome. 🙂
Currently, there is no plan to add such. But I will consider this improvement in future updates.
Great plugin!!, Saved a ton on time
What can we do if the subcategory has comma in the name?
You have that in your screenshot also – Ties, Cufflinks and Pocket Squares.
If I do
Men>> Ties, Cufflinks and Pocket Squares
It create Men as a parent category, Ties as Child of Men and Cufflinks and Pocket Squares as another parent category.
Hi There,
You can use the bwcc_separator filter that helps to change the separator from , to anything that you want.
Code –
// This function will change the separator from , to &// To create multiple create please use Category A&Category B
function bwcc_change_separator() {
return '&';
}
add_filter( 'bwcc_separator', 'bwcc_change_separator' );
Please let me know if that works for you.